Parts of a Shoe: The Complete Anatomy, Upper to Outsole
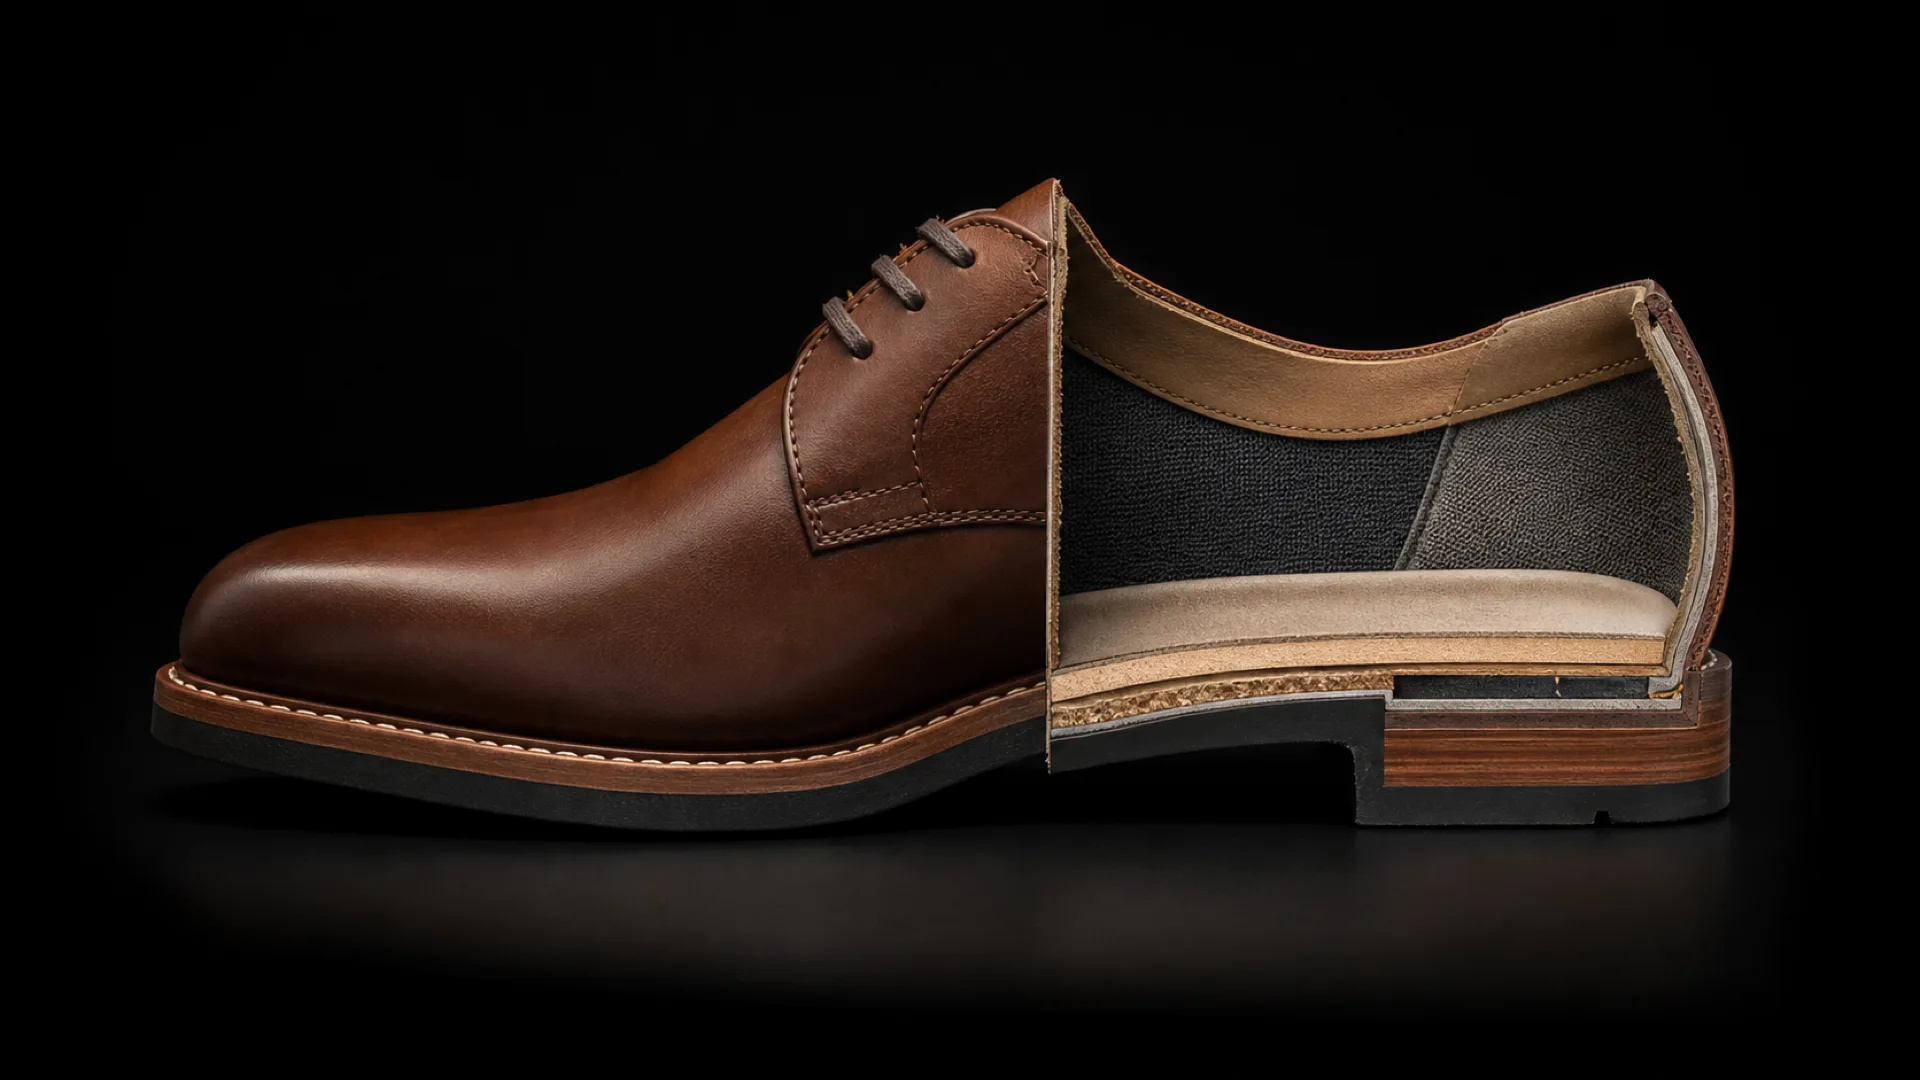
A shoe looks like one object. It is between fifteen and forty separate pieces, most of which you never see, each cut to a shape someone had to work out. Learning their names is the first step; learning why each one exists is what separates knowing the vocabulary from understanding footwear.
Key Takeaways
- A shoe has three groups of parts: the upper (everything above the sole), the sole unit (everything below), and the internal reinforcements between them.
- The upper's main pieces are the vamp, the quarters, the tongue and the collar. The pattern is the set of these shapes flattened out.
- The parts you cannot see — toe puff, counter, shank, insole board — are what keep the shoe's shape over time.
- Names differ by tradition: vamp/front, quarter/back. Sneakers use a separate vocabulary entirely — toe box, mudguard, saddle, midsole — covered in its own section.
- Every part is a piece to be cut, so part count drives cost: more panels means more cutting, more stitching and more tolerance.
What Are the Parts of a Shoe?
A shoe divides into three groups:
- The upper — every component above the sole, the part that wraps the foot.
- The sole unit — every component below the foot, from insole to outsole and heel.
- The reinforcements — internal pieces, invisible when the shoe is finished, that give it structure.
That grouping matters more than the individual names, because it maps to how a shoe is actually made: the upper is cut and stitched flat then shaped over a form, the sole unit is attached afterwards, and the reinforcements go in during shaping. A part's group tells you when in the process it appears.
Most anatomy guides list the visible parts and stop. This one includes the hidden ones, because in a technical office those are half the conversation.
Parts of the Upper
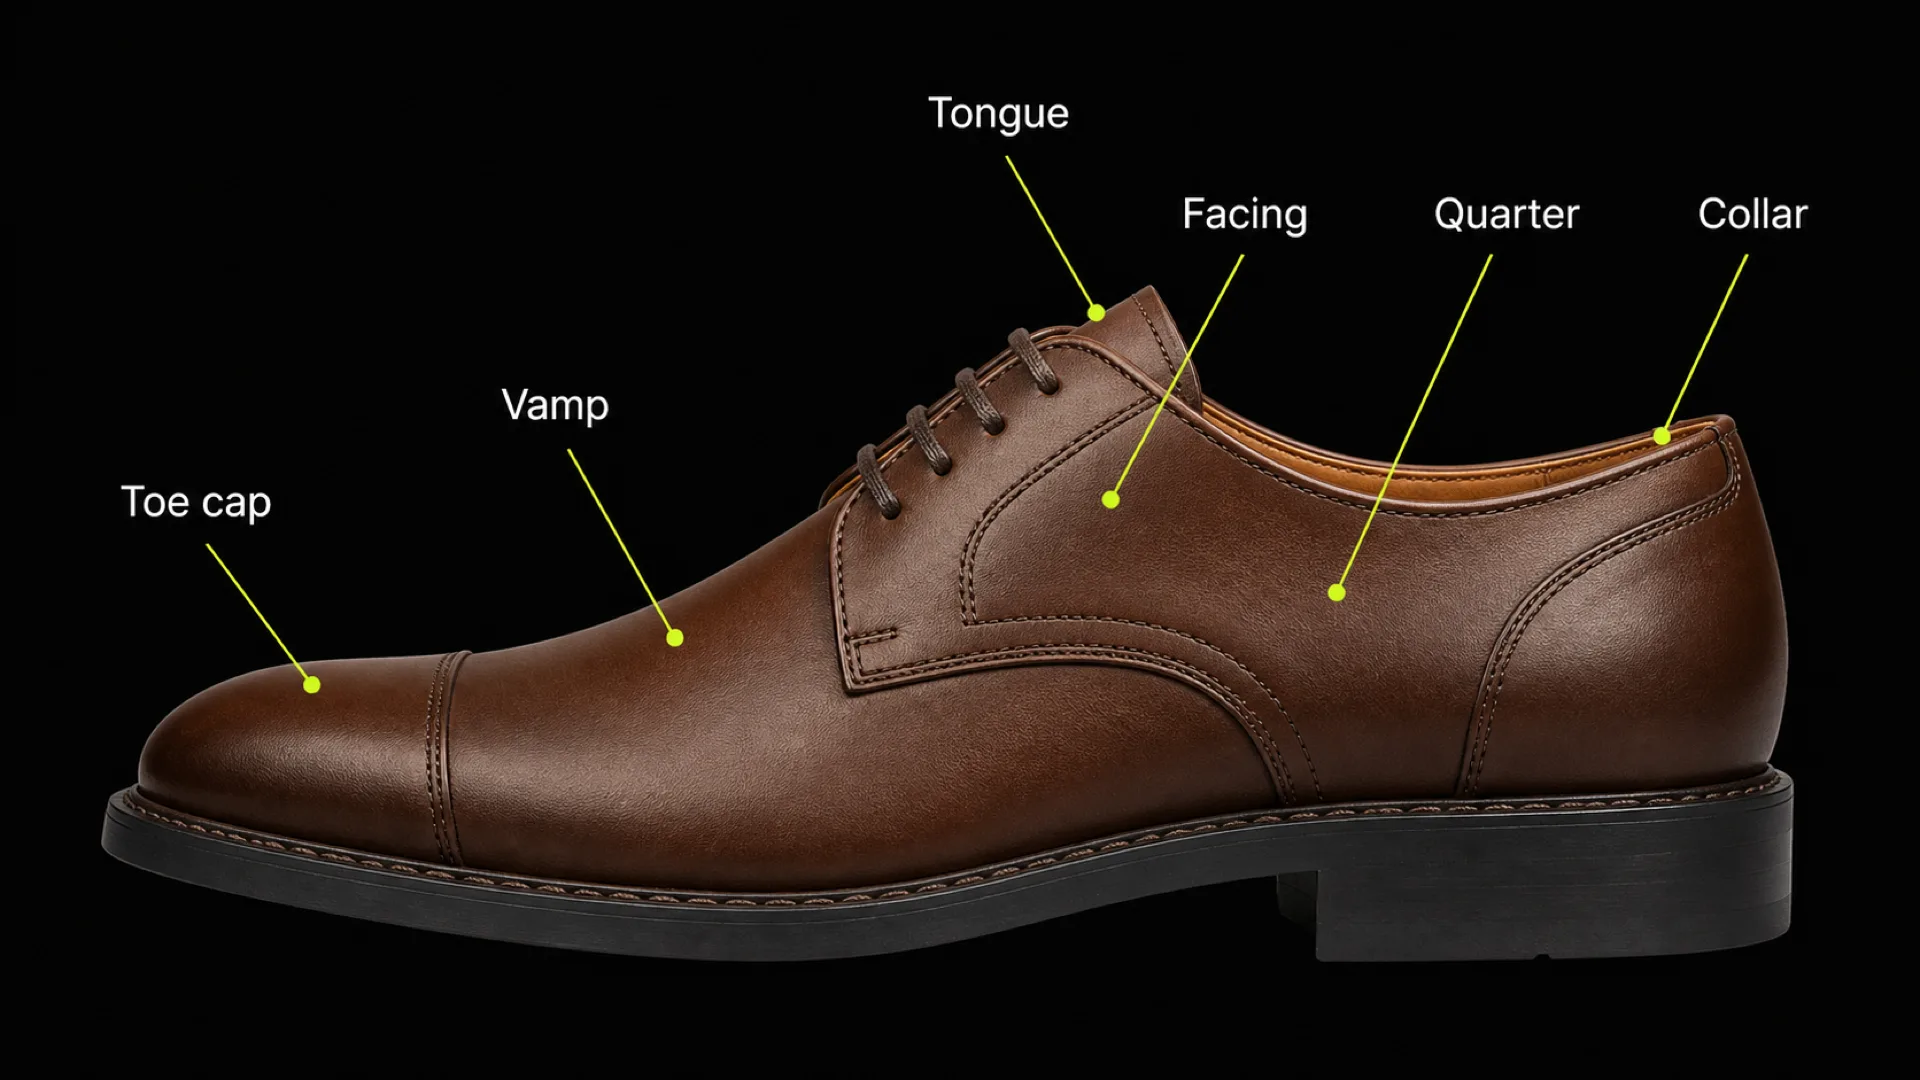
The upper is what a designer draws and a pattern engineer cuts. In a classic derby or oxford, these are the pieces.
- Vamp — the front section covering the toes and the top of the foot. The largest single piece on most shoes, and the one that takes the most stress when shaping. Also called the front.
- Quarters — the two side/rear sections that wrap from the vamp around to the heel. On many constructions they meet at a back seam down the centre of the heel.
- Toe cap — an extra panel over the toe, decorative or protective. A straight cap is the plain version; a wingtip (brogue) is the same idea with a decorative shaped edge.
- Tongue — the strip under the lacing. May be cut as part of the vamp (a bal or one-piece tongue) or as a separate piece.
- Facing / eyestay — the panel carrying the lace holes. Whether it sits on top of the vamp (derby) or under it (oxford) is the single distinction between those two shoe types.
- Collar / topline — the finished edge around the ankle opening, usually padded and bound.
- Eyelets — the lace holes, often reinforced with metal rings.
- Throat — the point where the vamp meets the facing. Its position controls how far the shoe opens, and therefore how easy it is to get on.
- Heel counter panel — the external rear panel, sometimes a separate piece for reinforcement or contrast.
Two naming notes worth knowing: British and American footwear traditions use vamp/quarter and front/back for the same pieces. And athletic footwear uses a different vocabulary altogether — covered next. None of it is wrong; it depends on which industry you are standing in.
The footwear design glossary collects these with the CAD and production terms.
Parts of a Sneaker: the Athletic Vocabulary
Sneaker construction descends from a different tradition, and its part names reflect that. The underlying logic is the same — an upper, a sole unit, reinforcements — but almost nothing is called what it is called on a dress shoe.
- Toe box — the front section over the toes. Roughly the dress-shoe vamp's territory, but the term refers to the volume as much as the panel.
- Mudguard — the reinforcement band running low around the toe and sides, protecting the joint where upper meets sole. No dress-shoe equivalent.
- Eyestay — the lace-hole panel. Same function as the facing.
- Saddle — the mid-panel over the instep, often carrying the branding, tying the lacing to the midsole.
- Heel counter / heel clip — the rear stiffener, frequently external on a sneaker where on a dress shoe it is always internal.
- Collar and tongue — as on a dress shoe, usually padded.
- Midsole — the cushioning layer, central to sneaker design and typically absent from dress construction. Where the technology lives: foams, plates, air units.
- Outsole — the rubber ground-contact layer, with a tread pattern.
- Toe cap / toe bumper — a rubber overlay at the front, protective rather than decorative.
- Heel tab / pull tab — the loop at the top rear for pulling the shoe on.
Two structural differences matter more than the vocabulary. First, sneakers bond more and stitch less — cemented and vulcanised constructions dominate, so overlays are glued or welded rather than sewn. Second, the midsole carries the engineering: on a dress shoe the last defines the shoe's character, while on a sneaker much of the performance story sits in the sole unit.
Piece counts also run higher than they look. A sneaker upper with layered overlays, a mudguard and separate branding panels can easily exceed a derby's, even though it reads as simpler.
The Lining
Between the upper and the foot sits a second, complete set of pieces: the lining. It is cut from its own pattern, in its own material — usually a softer leather or a textile — and it is not simply the upper repeated.
- Vamp lining — behind the front section.
- Quarter lining — behind the sides and rear.
- Heel grip / heel lining — the rear lining strip, often a tougher leather because it takes the most abrasion.
- Sock lining — the piece you see inside when you look down into the shoe, usually carrying the brand.
The lining pattern differs from the upper pattern in dimension, because the lining sits on a smaller radius: it is inside the upper, so its pieces are slightly smaller and their seams are deliberately offset so two thicknesses never stack in the same place. Getting this wrong produces a ridge the wearer feels under the foot or against the heel.
The Reinforcements: the Parts You Cannot See
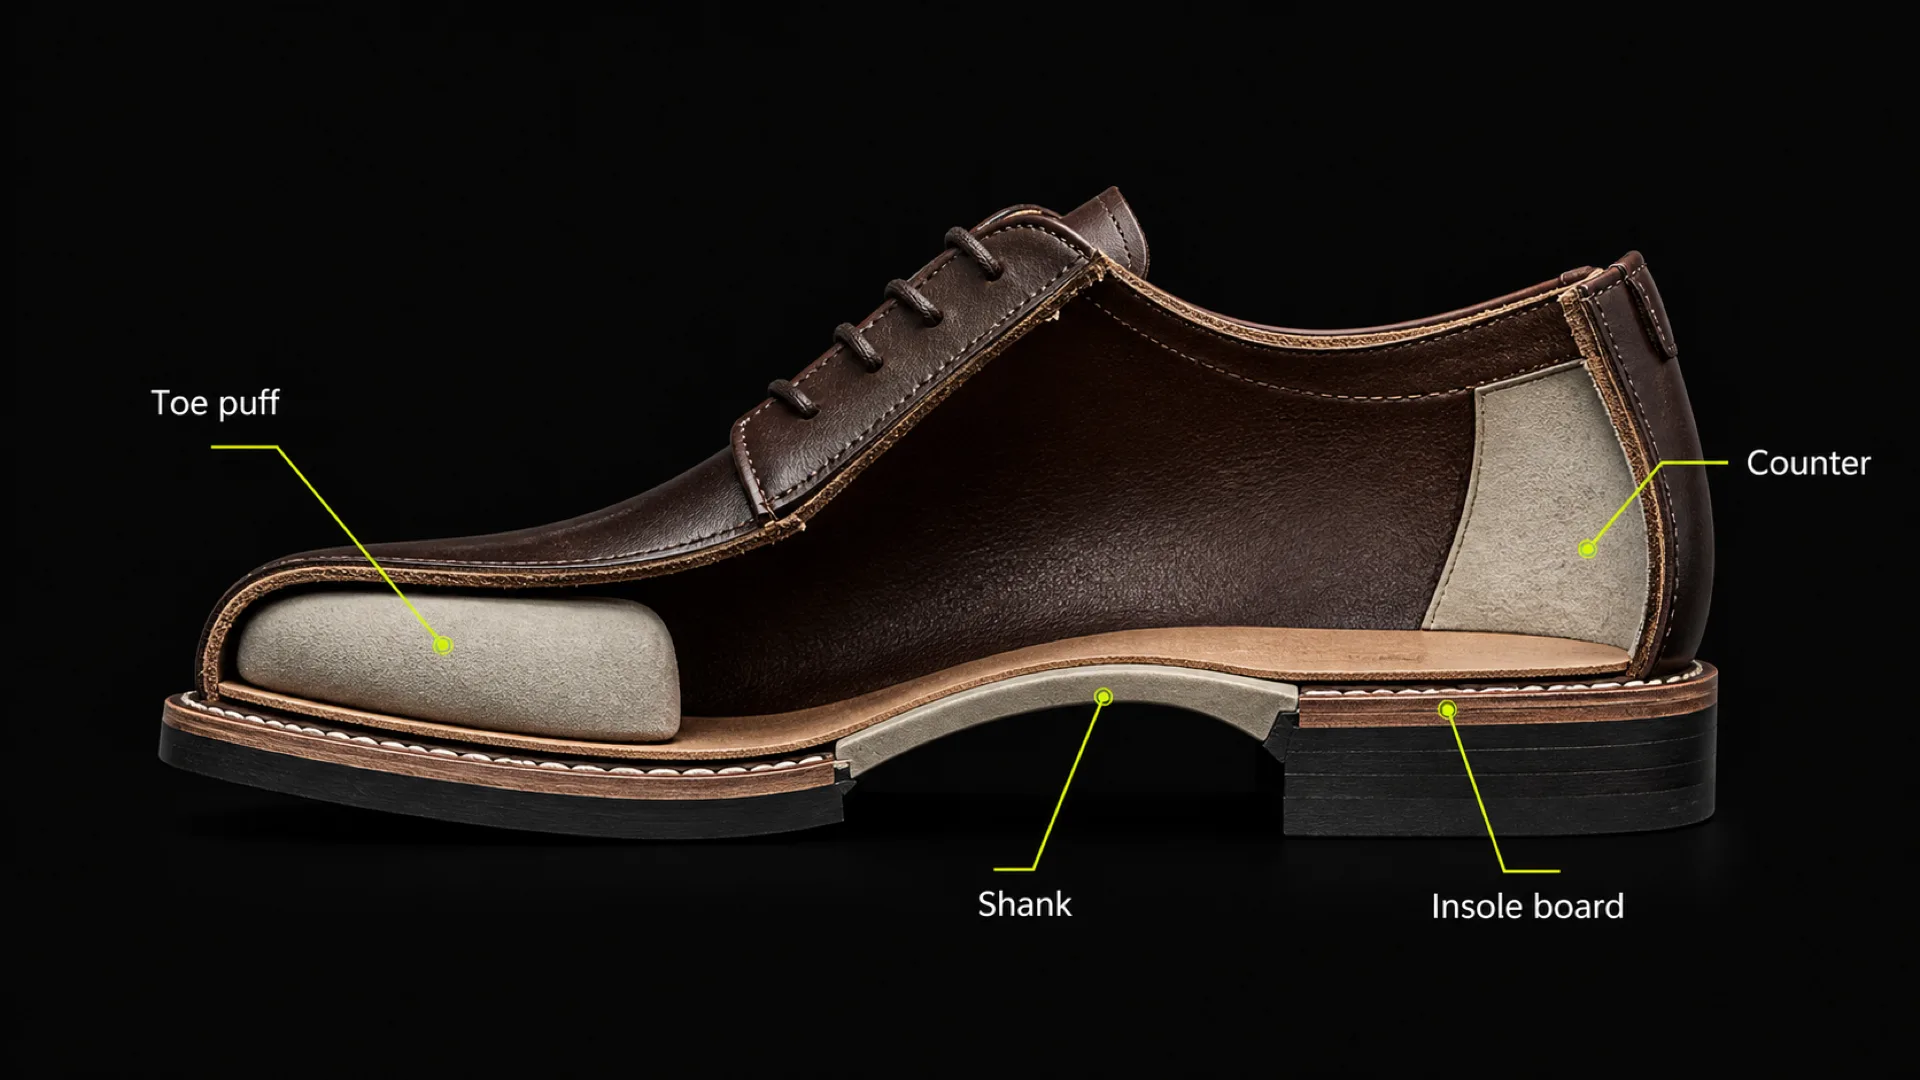
These are the pieces that decide whether a shoe still looks like a shoe after a year.
- Toe puff (toe box stiffener) — a stiffener inside the front that holds the toe shape. Without it the toe collapses within weeks.
- Counter (heel stiffener) — a stiff insert at the heel that keeps the rear from crumpling and holds the foot in place. Along with the toe puff, this is what "structured footwear" means.
- Shank — a rigid strip, historically steel and now often composite, running under the arch. It carries the load between heel and forepart and stops the shoe flexing where it should not. In heeled footwear it is structural, not optional.
- Insole board — the layer the upper is attached to underneath, forming the base the foot sits on.
- Filler — the material filling the cavity between insole and outsole, giving the sole its solidity.
- Toe and heel reinforcement tapes — narrow strips backing stress lines and seams.
- Backer / doubler — a reinforcement layer bonded to the upper material to control stretch, common on thin leathers and textiles.
Every one of these is an additional pattern piece. A "simple" shoe with a five-piece upper often has twelve to fifteen pieces once lining and reinforcements are counted.
The Sole Unit
- Insole — the layer directly under the foot, inside the shoe. In many constructions it is where the upper is anchored.
- Midsole — an intermediate layer for cushioning or height. Central in athletic footwear, absent in many dress constructions.
- Outsole — the bottom surface in contact with the ground. Leather, rubber, TPU or EVA, depending on use.
- Heel — the raised rear block. Built from stacked layers (a stacked leather heel), moulded as one piece, or covered in the upper material.
- Top piece — the replaceable wearing surface on the bottom of the heel.
- Welt — in a Goodyear-welted shoe, the strip of leather stitched around the perimeter joining upper, insole and outsole. It is what makes the shoe resoleable.
- Feather edge — the line where upper meets sole around the perimeter.
- Shank cavity / waist — the narrowed sole section under the arch.
How the Parts Are Held Together: Construction Types
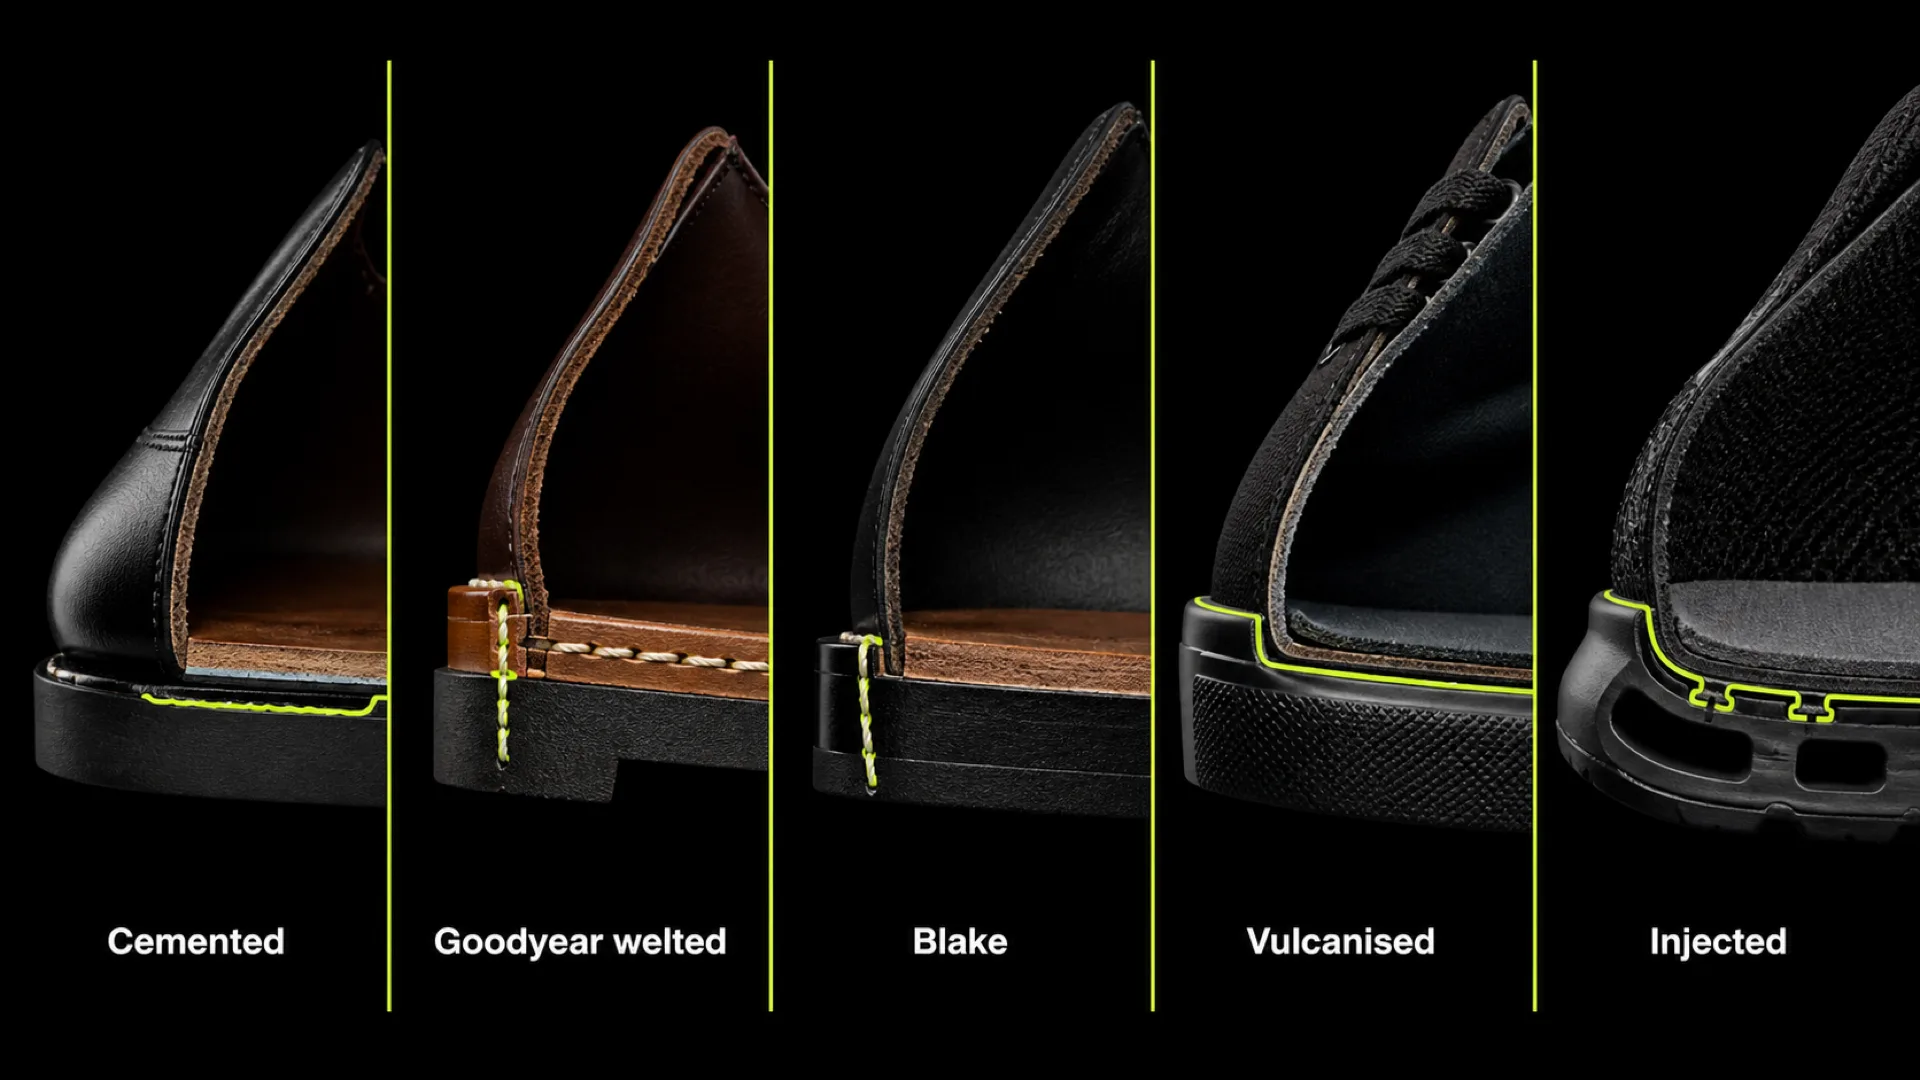
The same set of parts can be assembled in different ways, and the method determines repairability and cost.
| Construction | How the sole attaches | Resoleable | Typical use |
|---|---|---|---|
| Cemented | Glued | Not practically | Most volume footwear, sneakers |
| Goodyear welted | Stitched via a welt to a rib on the insole | Yes, repeatedly | Classic dress shoes, boots |
| Blake / stitchdown | Stitched directly through insole and outsole | Yes, once or twice | Slimmer dress shoes |
| Vulcanised | Rubber bonded under heat | No | Canvas sneakers |
| Injected | Sole moulded directly onto the upper | No | Work and volume footwear |
Construction is decided early, because it changes the upper pattern. A Goodyear-welted upper needs more material at the bottom edge to be turned under and held; a cemented upper needs less. You cannot switch construction late in development without re-cutting the pattern.
Why Part Names Matter More Than They Look
For a designer or a technician, the parts are not vocabulary. They are the pieces of the pattern.
Every part is a shape someone has to cut. The upper is designed on a three-dimensional form — the last — and then flattened into flat pieces the cutter can work from. That flattening step is what converts "vamp" from a name into a physical outline with an allowance around it.
Part count is cost. Each additional panel is a cutting operation, a stitching operation and a tolerance that can go wrong. A twelve-piece upper is not a budget upper, whatever the material costs. This is the single most common way a design becomes unmakeable at its target price — and it is decided at the sketch stage, usually without anyone noticing.
Part boundaries are where shoes fail. Seams, panel edges and the transitions between reinforcement and unreinforced material are the stress lines. Where you choose to put a panel edge is a durability decision as much as an aesthetic one.
This is why footwear-specialised CAD organises itself around parts rather than surfaces: you build the upper on the last, define the panel boundaries, and the software gives you each piece with its allowances. The upper modelling workflow is that process in practice, and how a shoe is designed puts it in the wider development sequence.
FAQ
What are the main parts of a shoe?
The upper (vamp, quarters, tongue, facing, collar), the sole unit (insole, midsole, outsole, heel) and the internal reinforcements (toe puff, counter, shank, insole board). A typical structured shoe has fifteen to forty individual pieces once lining and reinforcements are counted, most of them invisible in the finished shoe.
What is the upper of a shoe?
The upper is everything above the sole — the part that wraps the foot. Its main pieces are the vamp at the front, the quarters at the sides and rear, the tongue under the lacing and the collar around the ankle opening. It is cut flat from a pattern, stitched together, then shaped over a last before the sole is attached.
What is the difference between the sole and the outsole?
"Sole" is often used loosely for the whole bottom of the shoe. Precisely, the sole unit has layers: the insole directly under the foot, an optional midsole for cushioning or height, and the outsole as the ground-contact surface. When someone says a shoe has a leather sole, they mean the outsole.
What is a shoe shank and do I need one?
The shank is a rigid strip under the arch that carries load between heel and forepart and stops the shoe flexing where it should not. In flat, soft footwear it can be omitted. In anything with a heel it is structural: without it the shoe collapses at the waist and the heel pitch changes as the shoe wears.
What is the difference between an oxford and a derby?
One part, positioned differently. On an oxford the facing (the panel with the lace holes) is stitched under the vamp, giving a closed throat. On a derby the facing sits on top of the vamp, giving an open throat. Same pieces, different overlap — and the derby opens wider, so it accommodates a higher instep.
What are the parts of a sneaker called?
Toe box at the front, mudguard as the low protective band around it, eyestay for the lace panel, saddle over the instep, heel counter or external heel clip at the back, collar and tongue at the opening, then midsole and outsole below. The underlying structure matches a dress shoe — upper, sole unit, reinforcements — but almost every part has a different name, and the midsole carries engineering that dress construction does not have.
Why do shoe part names differ between sources?
Because footwear developed as separate regional crafts and later split into separate industries. British and American traditions use vamp/quarter and front/back for the same pieces. Athletic footwear developed its own vocabulary — toe box, mudguard, heel clip. Orthopaedic and running-retail sources add their own. All are valid in context; what matters is being consistent within one tech pack.
How many pieces are in a shoe?
A simple cemented sneaker may have around fifteen. A structured Goodyear-welted dress shoe commonly runs to thirty or forty once you count upper panels, lining pieces, reinforcements, sole layers and heel components. Part count is one of the strongest drivers of manufacturing cost, because each piece is an operation.
From Parts to Pattern
Knowing the parts is the entry point to footwear, and it stays useful long after: fit problems, cost problems and durability problems all get described in these terms. When a factory says the counter is too low or the vamp is pulling at the throat, the words are the diagnosis.
The step after naming the parts is learning to produce them — designing the upper on the last, deciding where the panel boundaries fall, and flattening each piece into something a cutter can use. That is the work of footwear pattern engineering, and it is where the 3D footwear design career actually begins.
I'm Susanna Zampieri — 3D footwear designer, official Icad Universe trainer and iCad Brand Ambassador. The 3D Footwear Design course teaches these parts as what they are in production: pieces you build on a last and flatten into a pattern.