Shoe Lasting: What It Is and How Uppers Are Pulled Over the Last
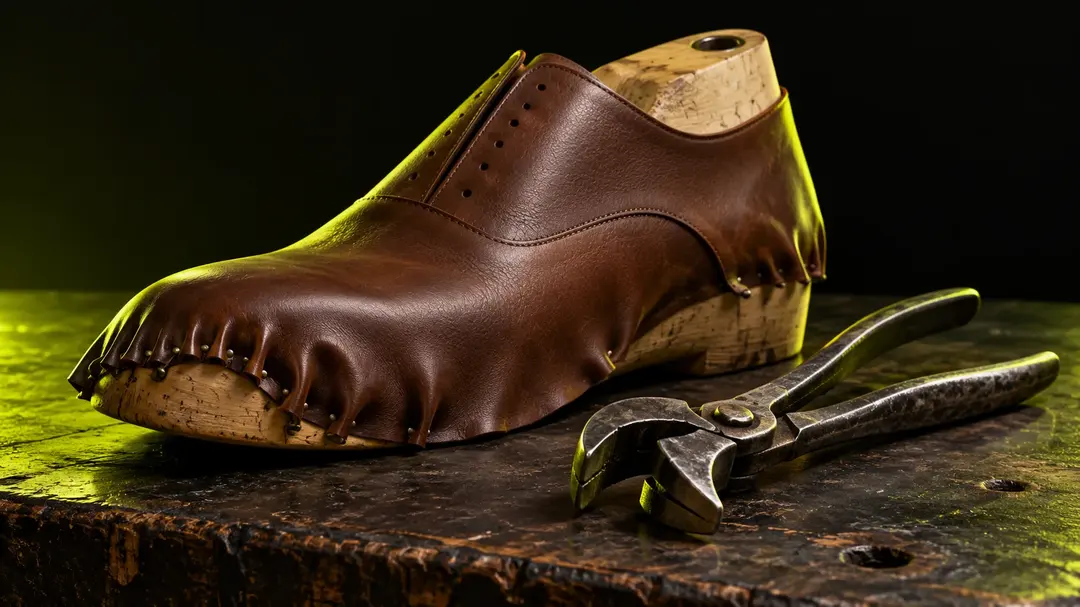
You can stitch the most beautiful upper in the world and still not have a shoe. At that point it is a soft, flat-ish shell with no volume and no posture. The shoe only appears at one moment on the production line: when the upper is stretched over the last and fixed in place.
That moment is called lasting, and it is where most fit, shape and finish problems are either created or prevented. This article explains the process as a designer and pattern-maker sees it: what happens in each stage, why the method depends on the construction, and which decisions on the pattern decide whether lasting goes smoothly.
Key Takeaways
- Lasting is the process of pulling the closed upper over the last and fixing it to the insole, so the shoe takes its final three-dimensional shape.
- The main stages are insole attachment, toe lasting, side and seat lasting, heat setting and de-lasting.
- The method changes with the construction: cemented, slip-lasted (Strobel) and welted shoes are lasted differently.
- Most lasting defects (wrinkles, twisted vamps, lifted toes) start in the pattern, not on the machine.
- Lasting allowance, stiffener choice and material stretch must be specified before the first sample.
What Is Shoe Lasting?
Shoe lasting is the manufacturing step in which a closed (stitched) upper is stretched over a foot-shaped form called a last and secured to the insole, giving the shoe its permanent three-dimensional shape. Everything before it is flat or semi-flat work. Everything after it, from sole attaching to finishing, depends on the shape lasting has set.
The word comes from the tool itself. The last is the form (see what a shoe last is for the object, its measurements and materials). Lasting is the verb: you "last" a shoe by wrapping the upper around it. For the wider craft, see general references such as Wikipedia's article on shoemaking.
A useful way to picture it: the pattern-maker designs a flat shape that wants to become a curved one. Lasting is the physical conversion, and the upper has to survive it without puckering, tearing or drifting off-centre.
Where lasting sits in the production flow
Lasting comes after cutting, skiving and closing (stitching) the upper, and before the sole is attached. For the full sequence from cutting to boxing, read how shoes are made. Here we zoom in on the middle of that chain, because it is the step where the upper is under the most mechanical stress.
Why Is Lasting the Step Where the Shoe Takes Its Shape?
Lasting is where the shoe takes its shape because it is the only stage that forces a flat-cut upper onto the curved geometry of the last. Stitching joins pieces; lasting gives them volume. Once the upper is fixed and set, the toe spring, heel curve and instep profile are largely locked in.
That has two practical consequences. First, errors are expensive: a poorly lasted upper cannot be fully corrected afterwards, and the sole will freeze the fault in place. Second, the last and the pattern are partners. A perfect last with a pattern that ignores how leather stretches still produces a bad shoe.
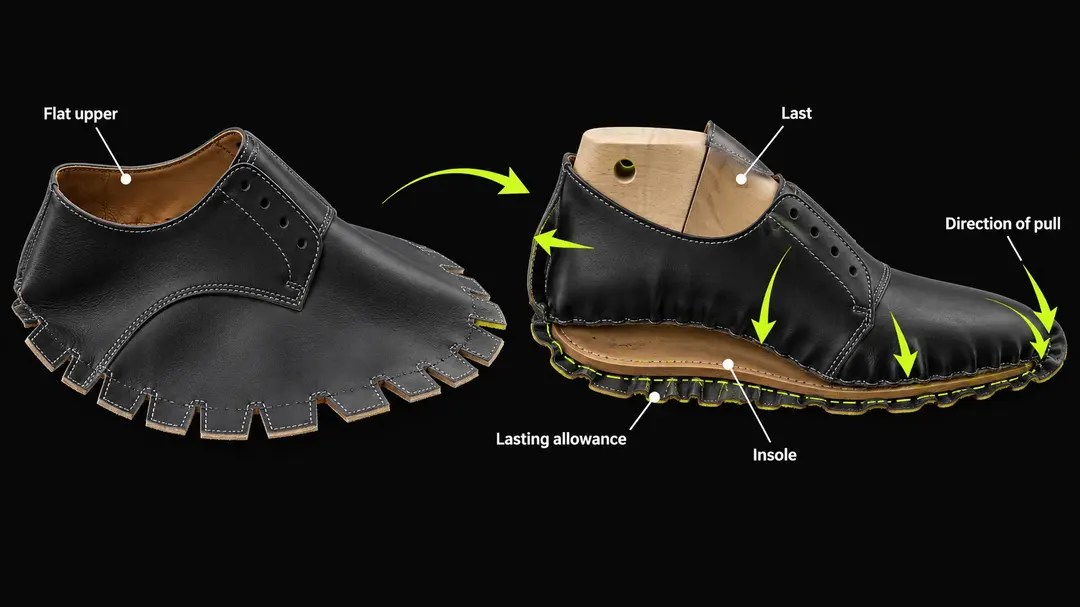
In the studio, I often explain it with a simple test. Take a flat paper pattern of a vamp and try to wrap it around a last without folding. You can't. The upper has to stretch in some zones and compress in others, and lasting is the controlled version of that.
What Are the Stages of Lasting a Shoe?
Lasting runs in a fixed order: attaching the upper to the insole, lasting the toe, lasting the sides and seat, then heat setting and de-lasting. Each stage controls one region of the shoe, and each depends on the one before it. Skipping the setting stage is the usual cause of a shoe that "springs back" after leaving the last.
1. Insole attachment
The insole is fixed to the bottom of the last, usually with tacks or staples in traditional work, or by a locating system (such as a pin or magnet) in modern production. The upper is then positioned on the last, aligned on the centre line of the toe and the back seam. Alignment here decides whether the finished shoe sits straight.
2. Toe lasting
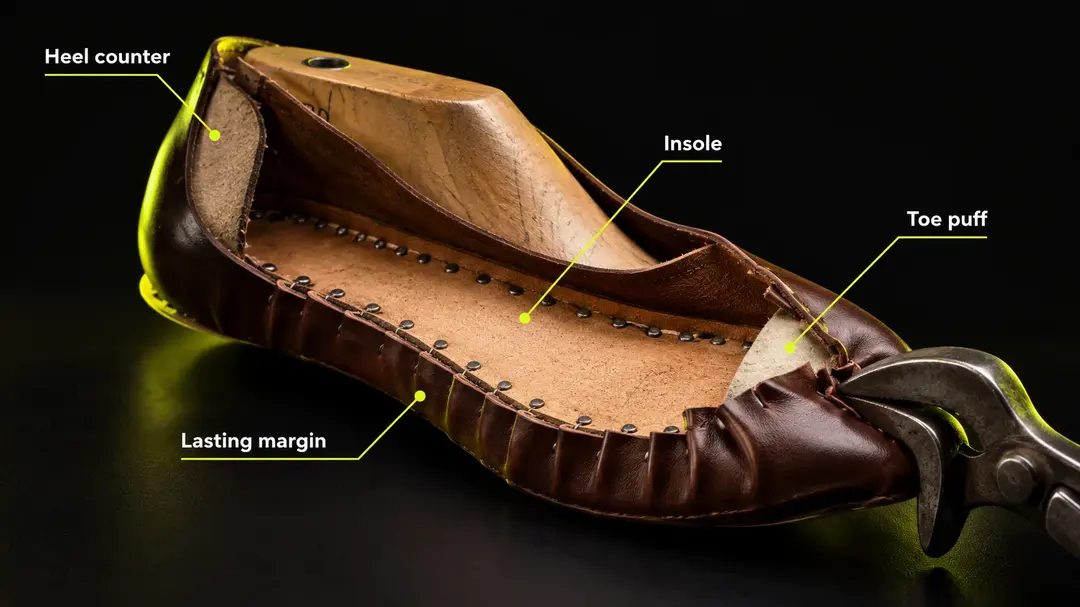
The toe is the hardest zone. Material must be pulled forward and down, then folded under the insole edge. Before this, a stiffener called the toe puff is placed between the lining and the upper to hold the shape. Many workflows last the toe first because errors there are the most visible.
3. Side and seat lasting
Next the waist and sides are pulled and fixed, then the heel seat. The seat area carries the heel counter (the rear stiffener), which must be moulded against the last so the heel cups the foot properly. Tension should be even from side to side. Uneven pull is what twists a vamp.
4. Heat setting
After lasting, the shoe stays on the last and passes through heat, steam or a setting chamber, depending on materials. Heat relaxes the stress in the upper and sets the shape of the last into the materials. Without it, the upper tends to creep back toward its flat state.
5. De-lasting
Once cooled, the last is removed (the "last out" or de-lasting step). The shoe now holds its form, ready for sole attaching or, in welted work, for further steps. A well-made upper keeps its shape after de-lasting. A badly lasted one visibly relaxes.
Is Lasting Done by Hand or by Machine?
Both exist, and they coexist in the same industry. Hand lasting uses lasting pincers, hammers and tacks, and it is still the standard for bespoke and some high-end handmade shoes. Machine lasting uses pull-over, toe-lasting and heel-seat machines that apply consistent tension at speed, which is what factories rely on.
| Hand lasting | Machine lasting | |
|---|---|---|
| Typical use | Bespoke, small batches, high-end welted | Industrial production |
| Control | Operator feel, adjustable per piece | Programmed, repeatable |
| Speed | Slow | Fast |
| Consistency | Depends on the craftsperson | High across a size run |
| Sensitivity to pattern errors | Operator can compensate | Errors show up as defects |
The last row matters for designers. A skilled hand laster silently corrects small pattern flaws by feel. A machine does not. If you plan for a factory, your pattern has to be right on paper, because nobody on the line will rescue it.
How Does the Lasting Method Change with the Construction?
The lasting method depends on how the sole will be attached. Cemented shoes have the upper edge folded under and glued to an insole board, Strobel (slip-lasted) shoes close the upper into a sock before it goes on the last, and welted shoes are lasted onto an insole with a rib. The construction decides the margin you need on the pattern.
For a full comparison of constructions, see shoe construction methods. Below is only what changes at the lasting stage.
Cemented or board lasting
In cemented construction, the upper's lower edge is folded under and glued to an insole board. This is the most common method in sneakers and commercial footwear. The margin (lasting allowance) is wiped and cemented flat, so the pattern must give enough material to hold under tension without creating bulk under the foot.
Slip lasting and Strobel
In Strobel construction, the upper is stitched to a flexible insole sock (the Strobel board), then the unit is slipped over the last. There is no folded margin under the foot, which is why these shoes feel flexible and light. Because the upper is closed all the way round before it meets the last, the pattern must let the sock slip over the last and stretch to its shape. There is no folded margin to absorb errors.
Welted lasting
Welted shoes, such as Goodyear-welted ones (see the Goodyear welt on Wikipedia), are lasted onto an insole with a rib that the upper and welt are later stitched to. The upper margin is pulled over the insole and held to the rib until it is stitched with the welt. It is a slower, more controlled process, and it suits heavier leathers.
What Must the Designer Anticipate Before Lasting?
A designer must plan the lasting allowance, the stiffeners, the stretch behaviour of the materials and the difference between leather and synthetics. These four decisions live on the pattern, long before the machine runs. If you leave them to the factory, you get the factory's defaults rather than your design.
Lasting allowance
The lasting allowance is the extra material below the last's bottom edge that is folded under the insole. It is not a constant. It changes by construction, material thickness and region of the shoe. A generous margin is safer but adds bulk. A tight one risks pull-out.
In my experience, the allowance should be reviewed zone by zone: toe, waist and heel seat behave differently, and a single uniform margin is often the first thing I change on a pattern that lasts badly.
Toe puff and heel counter
The toe puff and the counter are the internal skeleton of the shoe. They decide how well the toe box and heel keep their shape after lasting. Their thickness, shape and material (thermoplastic, leather board, fibre) must be specified in the tech pack and cut to match the last, not left to improvisation. See how to build a tech pack for where these specs go.
Material stretch and recovery
Every material has a direction in which it stretches and a degree to which it springs back. Calf leather moulds well and keeps its shape after setting. Knits and stretch textiles tolerate more pull but may lose tension. The pattern should be cut so the stretch direction of the material aligns with the direction of pull at lasting.
Leather versus synthetics
Leather is forgiving: it can be conditioned with moisture, stretched and heat-set. Many synthetics and coated fabrics are less so. They may resist stretch, show pull marks or fail to hold shape. When a design uses a synthetic, test it on the actual last early, because the behaviour is often different from what a swatch suggests.
What Are the Most Common Lasting Defects and How Does Pattern Design Prevent Them?
The most common lasting defects are wrinkles, twisted vamps, lifted toes, loose heels and visible pull marks. Many of them trace back to the pattern, the last or the stiffeners rather than to operator error, although machine settings matter too. Prevention happens when the pattern is built with the right allowances, balanced lines and tested against the actual last.
| Defect | Typical cause | Pattern-side prevention |
|---|---|---|
| Wrinkles on the vamp | Too much material in the zone, or uneven tension | Correct pattern flattening, reduce excess length, balance darts or seams |
| Twisted vamp | Centre line off, uneven pattern halves | Mark and check centre line on pattern and last |
| Lifted or collapsing toe | Weak or badly shaped toe puff | Specify puff material and shape to match the toe box |
| Loose or slipping heel | Counter not matched to the seat of the last | Cut the counter from the last's heel profile |
| Pull marks or tearing | Thin material, tight allowance | Add reinforcement, adjust allowance, test stretch |
| Bulky margin under the foot | Allowance too generous | Reduce margin, skive edges |
A flat pattern that is accurate to the surface of the last avoids many of these problems before they start. That is the core idea behind 3D-to-2D pattern flattening: if the flat shape is derived from the last surface instead of guessed, the upper arrives at lasting already close to its final geometry. For the broader workflow, see shoe pattern making.
How Does 3D CAD Simulate the Last Surface?
3D footwear CAD simulates lasting by working directly on a digital model of the last: the upper is designed on its surface, then flattened into patterns that account for the curvature the material must follow. This lets the designer see where material will compress or stretch before cutting a single piece.
In the studio, I model the upper on the digital last and check the flattened pattern against it. If a zone shows heavy distortion in the flattening, I know it will wrinkle or pull at lasting, and I can adjust seams or lines in advance. In Icad Universe, the footwear CAD developed by INESCOP in Elche, Spain, this loop between 3D surface and 2D pattern is the basis of the workflow. The tool does not replace physical sampling, but it reduces the number of rounds spent finding problems that were visible in the model.
A good digital last is the starting point. For how the last itself is modelled, see shoe last 3D modeling. And for how a last relates to fit and shape, return to what a shoe last is.
FAQ
What is lasting in shoemaking?
Lasting is the step where the closed upper is pulled over a last and fixed to the insole so the shoe takes its three-dimensional shape. It follows stitching and comes before sole attaching. It includes toe, side and seat lasting, then heat setting and de-lasting.
What is the difference between lasting and a last?
The last is the foot-shaped form, a tool. Lasting is the process of shaping the upper over it. In short: the last is the object, lasting is the action. The object is explained in the article on what a shoe last is.
Why is the toe lasted first?
In many workflows the toe is the hardest and most visible zone, so it is set before the sides and heel. That way, errors can be caught early and the rest of the upper can be adjusted to the toe's position, which keeps the centre line straight.
Do all shoes get lasted the same way?
No. Cemented, Strobel (slip-lasted) and welted shoes use different lasting methods because the sole is attached differently. The construction decides the margin on the pattern and the machines used. Compare them in shoe construction methods.
Can lasting problems be fixed after the shoe is made?
Rarely. Once the sole is attached, the shape is locked in. Minor surface issues can sometimes be improved, but wrinkles, twists or weak toes mostly require a pattern or process change for the next batch.
From Lasting to Design: Where to Go Next
Lasting is the point where design meets physics. Everything you decide on the pattern, from the allowance to the stiffeners to the stretch direction, shows up here as either a clean shoe or a defect you can't hide.
If you want to learn how to design the upper on a digital last, flatten it into patterns and anticipate lasting before sampling, the 3D footwear design course walks through that workflow step by step, using Icad Universe.
Written by Susanna Zampieri, 3D footwear designer, direct Brand Ambassador of iCad and official trainer of Icad Universe.