How to Draw Shoes: The Footwear Designer's Step-by-Step Method
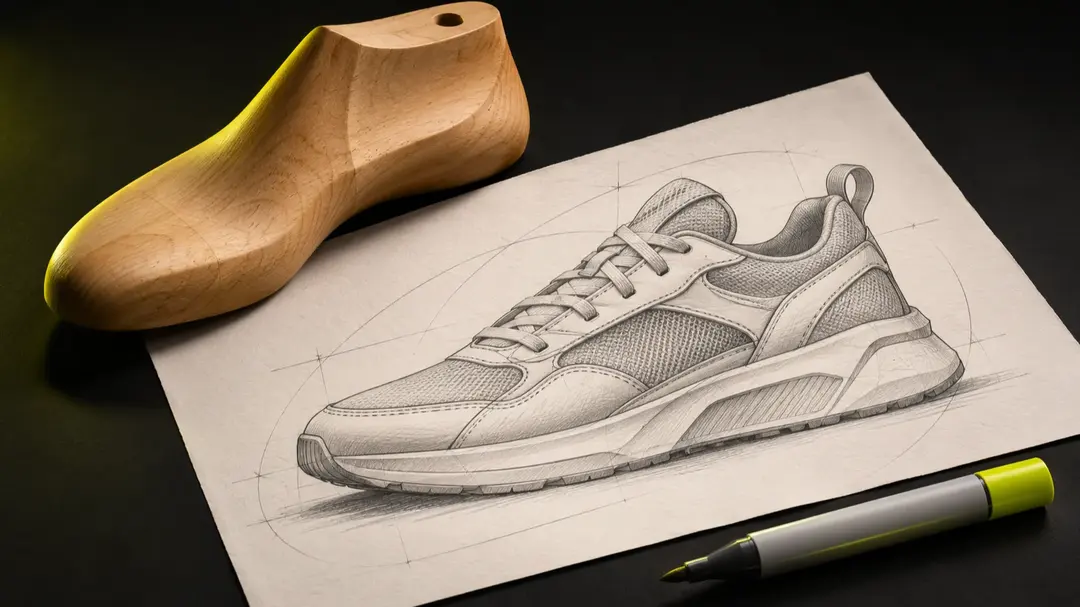
Most tutorials on how to draw shoes start with an outline of a shoe-shaped object and fill it in. That works for an illustration. It does not work for a design, because a footwear designer is not drawing a shape, they are drawing something that has to be built around a foot.
The method below is the one used in footwear studios: start from the last, fix the proportions, draw in the standard views, and keep the drawing honest enough that it can later become a technical drawing and a 3D model. It takes more setup than a free-hand doodle and gives drawings that look like real shoes.
Key Takeaways
- Designers draw a shoe on top of its last, not from imagination: the last decides length, volume, toe shape and heel height.
- The lateral (outside) side view is the base drawing. Medial, top and three-quarter views are built from it.
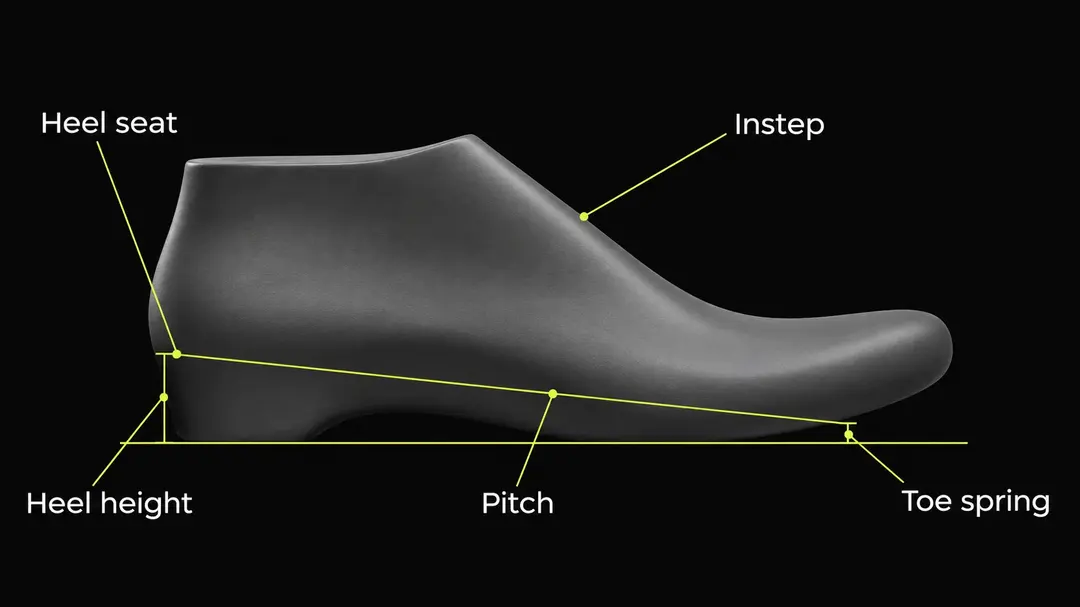
- Three proportions make or break a shoe sketch: heel height, toe spring and the pitch of the foot.
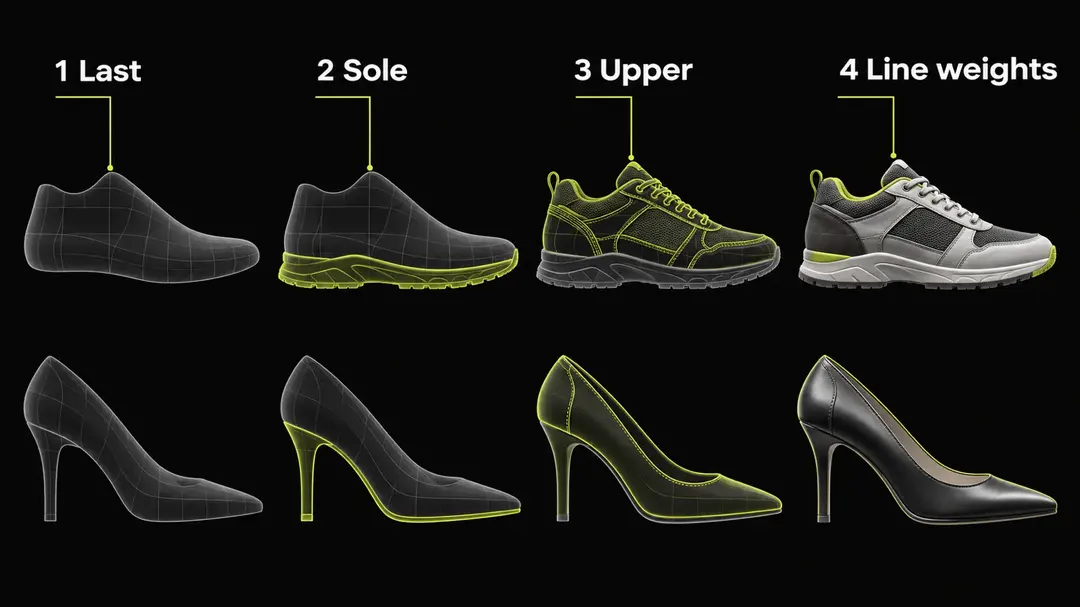
- Use two or three line weights: heavy for the silhouette and sole, medium for panel edges, light for stitching and details.
- A sketch communicates intent; a technical drawing specifies. The same lines should be reusable for both.
What Is Shoe Drawing in Footwear Design?
Shoe drawing in footwear design is the practice of sketching a shoe over the shape of its last, in standard views and proportions, so that the drawing can be developed into a technical drawing, a pattern and a 3D model.
The difference from general illustration is the constraint. An illustrator can bend a sneaker into any pose. A designer cannot, because the shoe has to wrap a foot, sit on a heel and flex at the ball. Every line you draw implies a seam, a panel or a material decision somebody will later have to cut. If you want the full chain from brief to production, how to design a shoe lays it out.
Start With the Last, Not the Shoe
In the studio, the first line of a shoe drawing is the last. The shoe last is the foot-shaped form a shoe is built over, and its side profile gives you the toe shape, the instep curve, the heel curve and the height of the heel, all at once.
You have three realistic ways to get one:
- A real last, if you have access to one. Place it on paper and trace its side profile.
- A last photograph or catalogue profile from a last maker, used as a drawing underlay.
- A last in 3D, which you can rotate and trace from any angle. See shoe last 3D modeling.
This is also the idea behind the popular "draw a shoe using a shoe last" tutorials: the last removes the guessing. When people struggle to draw shoes, the problem is almost never their line quality. It is that the underlying foot shape is wrong, so nothing sits right on top of it.
The Three Proportions That Decide Everything
Before drawing any detail, fix these three.
Heel height
Measure it vertically from the ground to the point where the back of the heel meets the seat of the shoe. A flat sneaker sits near the ground; a stiletto pump rides high. Everything else is drawn relative to it, so decide it first and mark it with a horizontal construction line.
Toe spring
Toe spring is the upward curve of the sole under the toes, so that the front of the shoe does not lie flat on the ground. Without it, a side view looks like a slipper stuck on a plank. Even a flat shoe lifts at the toe; draw a gentle rise, not a ski jump.
Pitch
Pitch is the angle of the foot relative to the ground, and it grows with heel height. A flat shoe has a near-horizontal foot; a high heel tilts the whole foot forward. Draw the last at the right pitch and the instep, the vamp line and the tongue or throat opening fall into place.
The Standard Views
Designers work in a small set of views, and each has a purpose.
| View | What it shows | Use |
|---|---|---|
| Lateral (outside) side | Full profile: toe, vamp, quarter, heel, sole | Base drawing, usually drawn first |
| Medial (inside) side | The arch side; often differs in panels and closures | Specification and tech pack |
| Top | Toe shape, vamp, throat, lacing | Checking symmetry and widths |
| Three-quarter | Volume and character | Presentation and marketing |
| Back and front | Heel counter, collar, toe box | Checking shape and balance |
Start with the lateral view. The medial view is the same silhouette, drawn on the other side, and usually carries different details, so do not mirror it blindly. The three-quarter view comes last: it is the one that looks good on a board, but it is the hardest to get right without the flat views behind it.
Step-by-Step: Drawing a Sneaker
- Set the ground line and the last. Draw a horizontal ground line, then place the last profile on it with a slight pitch. For a sneaker the heel is only a little above the toe.
- Add the sole unit. Offset the bottom of the last downward to draw the midsole and outsole. A sneaker sole is thick, so give it real height at the heel and a gentle taper toward the toe, with the toe spring curving up at the front.
- Draw the silhouette of the upper. Trace the shape above the last: toe cap, vamp, tongue top, collar and heel tab. Keep it slightly larger than the last, since the upper wraps around it.
- Place the panel lines. Split the upper into its pieces: toe cap, vamp, eyestay, quarter, heel counter. This is where you decide the design, and where the parts of a shoe is useful as a vocabulary check.
- Add the closure. Draw eyelets or the lace path, then the tongue and lining line at the collar. Space the eyelets evenly along the eyestay.
- Add details. Stitching, perforations, logos and branding. Keep them light so they do not fight the structure.
- Go over the drawing with line weights (see below) and add flat colour or shading last.
Step-by-Step: Drawing a Pump
A pump is drawn with the same method, but the heel changes the geometry.
- Draw the ground line and mark the heel height. This is the defining line of the drawing.
- Place the last at a steep pitch. The foot points downward toward the toe, with the heel raised. Check that the angle looks plausible: if the shoe appears to be sliding forward, the pitch is too steep for the heel height.
- Draw the heel. Define the heel's front, back and base, and its taper. Then draw the top piece (the small tip that touches the ground). See parts of a high-heel shoe for the names.
- Draw the sole and platform, if any. A pump usually has a thin sole; a platform adds a visible block under the forepart, which lowers the effective pitch.
- Draw the upper. The key line is the throat line, the edge that follows the opening across the foot. Its curve gives the pump its character, so redraw it a few times before committing.
- Check the back. The heel counter and the collar should hug the heel without gaps, and the back line should be consistent from the heel curve down to the heel base.
- Add details and line weights, as for the sneaker.
Line Weight: Three Levels Are Enough
Line weight makes a drawing readable at a glance, and it is the quickest way to make an amateur sketch look professional.
- Heavy for the outer silhouette and the contact with the ground. It anchors the shoe.
- Medium for panel edges and the boundary between upper and sole.
- Light for stitching, perforations, texture and construction lines.
Consistency matters more than the exact values. When all lines have the same weight, a shoe looks flat and the eye cannot tell structure from decoration.
Common Mistakes
- Drawing without a last. The shoe comes out too narrow, too flat or the wrong length.
- Forgetting toe spring. The shoe looks stuck to the ground.
- A heel that does not match the pitch. The shoe looks like it will tip over.
- Mirroring the lateral view. Real shoes often differ between the outside and inside.
- Too many details too early. Structure first, decoration last.
- Panels that cannot be cut. A line in a sketch costs a seam in production. In the studio I check whether a line is a real seam before I commit to it.
From Sketch to Technical Drawing to 3D
A sketch is where the idea lives; it is not what a factory builds from. The next step is a clean technical drawing: flat, proportional, with every seam and panel edge drawn. In production this becomes part of a shoe tech pack.
Then comes 3D. In footwear CAD you model the last, draw the style lines on its surface and develop the upper from them, which is why a sketch drawn with real construction lines transfers well. Drawn on the last, panel lines are already in the right place. How to model a shoe upper in 3D shows that step, and 3D shoe design for beginners is the place to start if you have never worked in 3D.
When I build an upper in 3D, the style lines I drew in the sketch are what I project onto the last surface, so the quality of the drawing directly sets the quality of the pattern.
FAQ
How do you start drawing a shoe?
Start with the last. Draw a ground line, then trace or place the side profile of a last on it with the right pitch for the heel height. Add the sole under it, then draw the upper around the top. Details come last.
What is the easiest shoe to draw for a beginner?
A flat sneaker or a simple derby in side view. Both have a low heel, a simple profile and clear panel lines. Pumps are harder because the heel changes the pitch of the whole shoe.
Why do my shoe drawings look wrong?
Usually the proportions: the shoe was drawn without a last, so the length, the toe shape or the heel and pitch are off. Check toe spring and heel height first, then the instep curve.
Which view should I draw first?
The lateral (outside) side view. It shows the full profile and the main panels, and the other views are built from it.
Do I need to be good at drawing to be a footwear designer?
You need to be able to communicate a design clearly, but not to draw beautifully. Many designers rely on tracing over lasts and templates, then move into 3D CAD, where the shape is modelled and not drawn.
Can I use a tablet or software instead of paper?
Yes. Many designers sketch on a tablet and clean up the technical drawing in a vector program. The method is the same: last first, proportions fixed, standard views.
From Drawing Shoes to Designing Them
Drawing is the fastest way to explore an idea. Building it, with the right last, upper pattern and sole, is how it becomes a product. I'm Susanna Zampieri, a 3D footwear designer, official Icad Universe trainer and iCad Brand Ambassador. The 3D Footwear Design course takes you from sketch to a 3D shoe and a pattern set a factory can use.